Bestowing a love for science in your children is a great thing to do while they are young. This doesn’t mean that they are going to grow up to be scientists but at least they will consider it. Giving your child exposure to fun science experiments can help them unlock an interest in the scientific world that you may not have realized they had. This is why babykidsdepot.com have created this easy to follow guide for parents to do 5 Fun Science Experiments that are perfect for young children before they go to school.
What child doesn’t love science? Kids are natural experimenters and they love to figure out how things work and what happens if you combine this with that. Hands-on and practical science activities are a great way to nurture a child’s innate curiosity, love of learning and help them develop problem-solving skills.
Here are some of the best (and easiest) science experiments of all time – guaranteed to provide hours of enjoyment and exploration.
#1 Oobleck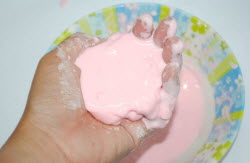
This has to be one of the most-loved science experiments of all time. Be warned though – it’s messy!! I highly recommend doing this outside and having children wear old clothes or an apron.
All you’ll need is cornflour and water. If you want colored oobleck, rather than white, you’ll also need some food coloring.
Grab a big mixing bowl and pour in a whole packet of cornflour. Put some water in a jug and if you want colored oobleck, add 2 or 3 drops of food coloring of your choice to the water.
Now begin pouring the water slowly and mixing it into the cornflour. There’s no exact measurements for this – you just have to keep going until it’s the right consistency. What you’re aiming for is something that looks like a liquid when it’s sitting in the bowl, but when you poke it or punch it or try to scoop some with a spoon, it is like a solid.
If you get the consistency right, you should be able to poke it or punch it or tap it and it will be rock solid. But if you rest your hand on it, your hand will sink into it as if it’s a liquid. You should be able to pick up a lump of it and as long as you keep it moving in your hand, it will be a bit like playdough but the minute you let it stay still, it will drip through your fingers like honey.
Is it a solid or is it a liquid? This is the question to explore with children. You can also talk about what other things are solids and liquids and whether there is anything else that is both.
#2 Lava Lamps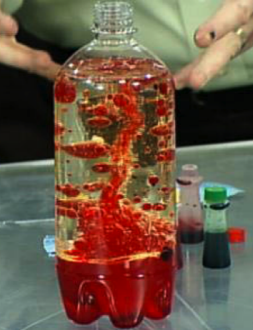
Lava lamps are so fascinating to watch and something kids love. Here’s how to make your own at home. You will need a clear bottle or jar (any kind is fine), vegetable oil, water, food coloring and alka-seltzer tablets. Alka-seltzer tablets are available at a local supermarket or the pharmacy.
Berocca will also work but will make the water orange colored, so if you add food coloring as well, use red, orange or yellow or you’ll end up with a muddy brown.
Fill the bottle or jar most of the way with vegetable oil. Then fill the rest of the bottle with water. The water will sink to the bottom under the oil. Add about 10 drops of food coloring – just using one color works best. The food coloring is water-based, so it will also sink and color the water that is now at the bottom of the flask. Break an alka-seltzer tablet into a few small pieces, and drop them into the bottle one at a time. Pop on the cap or lid of the bottle/jar and watch your lava lamp bubble away. As the reaction slows down, simply add more alka-seltzer.
Small children may want to shake the bottle. You can let them do this to see what happens. It’s a good experiment but it will not return to the original state so once it’s shaken, you won’t get the lava lamp effect any more. Lava lamps work because of two scientific principles – density and polarity. If your child is old enough, research these ideas with them and figure out together how they apply to the lava lamp experiment.
#3 Fizzing Rainbows Science Experiment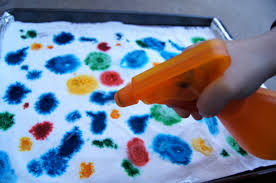
Bicarb soda and vinegar is another all-time favorite science experiment for kids. This one is also recommended
for outdoors!!
You will need some empty jars, food coloring, vinegar and bicarb soda. It’s best to buy the cheap cleaning vinegar in large containers for science experiments as it’s much cheaper. You can also buy bicarb soda in bulk from places like Aussie Soap Supplies which is cheaper than supermarkets.
Half fill the jars with vinegar and use food coloring to make the liquid in each one a different color. This is also a good exercise in learning to mix colors or make different colors with just red, yellow and blue. Then give your child a spoon and the bi-carb and let them put a spoonful into the jar and watch it fizz.
Another fun thing to do is to get a baking tray and put lots of dots of food coloring all over it. Then cover it with a layer of bicarb soda so that you can’t see the color. Fill a spray bottle or water pistol with vinegar and let the children squirt the tray. When the vinegar hits a spot where there is a dot of color under the bicarb soda, the bubbles magically change color!
#4 Swirling Milk Experiment
For this fun and colorful experiment you will need – 1 cup full-cream milk (skim milk contains too much water to be effective with this experiment), 4 different food coloring (you have to use the standard ones, natural ones are not as concentrated and so don’t work as well), dish washing liquid, a medium-sized bowl.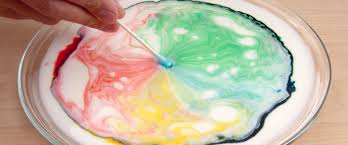
Pour the milk into the bowl. Place one drop of each of your colors into the milk, keep the drops close together. Add a drop of dishwashing liquid to the mix. Watch the colors swirl around. It’s really fascinating.
What’s happening is that the fat and protein molecules in the milk are altered by the soap. This causes them to roll around. Once the soap molecules have mixed evenly with the fat and protein molecules in the milk the motion will stop. So keep adding drops of dishwashing liquid when the action slows down.
#5 Protect an Egg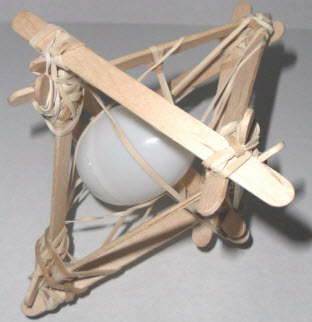
This experiment is not really about chemistry like the ones above, but about scientific method, testing hypotheses and physics. You will need some eggs you’re prepared to have broken (also an outside activity) and a big assortment of bits and pieces – cardboard boxes, straws, pop-sticks, newspaper, plastic containers etc – anything you can find laying around the house or in recycling. You’ll also need a roll of masking tape.
Ask children to design a capsule that will protect the egg from being broken when thrown off the highest height you can find (top of a ladder, the roof of your house if it’s safe, a wall).
Let children build a capsule for their egg. The key thing here is not to intervene. As an adult, you’ll be able to see why their design will/will not work but if you just tell them, they won’t learn anything. Let them try their invention themselves.
If their egg is protected and does not break, you can try it from higher or onto a harder surface. If their egg does break, ask them to explore and discuss why they think it might have broken, and how they could either create a new design or adapt their design so that it won’t break next time. Kids LOVE this activity and the suspense of seeing whether the egg will break or not is so much fun. It teaches kids a lot about gravity, forces and physics though, and is great for problem-solving skills.
Well, that’s 5 super-cool science activities to try with kids that are great springboards into further science learning and investigation, as well as being so much fun. Let your children do the experiments and then create their own. Happy experimenting!
